How to sew Gingko leaves freehand.
When you add some gingko leaves to your fmq samples you have beautiful presents for your family and friends. They love them in every color combination! To fmq a gingko leave you need to know something of the anatomy of this characteristic leaves.
1. The anatomy of a gingko leave
2. Freehand gingko leaves
3. Sampler-presents with gingko leaves.
4. Different shades of gingko leaves in one color.
1. The anatomy of a gingko leave
- The leaves of the Ginkgo are remarkable for the fan of simple, forked veins. The veins are slightly raised and give a ribbed appearance to the foliage.
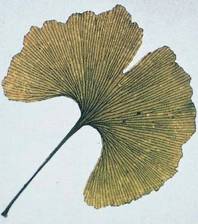 |
| When you look well at the veins you see they are forked and not branched |
- Most of the gingko leaves are notched with a deep slit in the middle.
- Elongated petiola as long as the foliage with a little knot at the end.

2. Freehand gingko leaves
The shape of the leave and the ribbed foliage, made the gingko leave easy for freee motion quilting. Look well at the pictures of some gingko leaves. Look at the veins. the shape of the petiola and the foliage. You find much more drawings and pictures of gingko leaves here.
- Draw some freehand gingko leaves on paper. Draw untill you know you can easy draw the leaves.
- Sandwich your sampler for a fmq filler.
- Choose a dark, medium and light thread of the same color.
- Before you free motion quilt the filler on your sampler, you need to embroider the gingko leaves. Decide where you want to sew the gingko leaves on your sampler.
- If nescesary mark with five dots the place where you want to sew a gingko leave like in the picture below.

- FMQ the contour of a gingko leave with the darkest color. The slit is always right above the petiola. Sew a little knob at the end of the petiola.
Sew the contour a second time.

- Sew with the same color veins and ends in the knob.

- Sew with the medium color veins. Starts at mark A and finish in A.

- Sew with the light color veins. Starts at mark A and finish in A.

- After finishing your gingko leaves: free motion quilt the filler or fillers on your sampler.
- Square your sampler and bind it with fabric in a color which matches your gingko leaves.
 |
| Sampler pebbling |
 |
| sampler fmq stippling, filling the space between the gingko leaves |
4. Different shades of gingko leaves in one color.
The sampler with blue gingko leaves has laeves in three shades of blue. To embroider these you need threads in four shades of blue: dark (D), medium dark (MD), medium (M), medium light(ML), light(L) and white (W).
Use for the darkest shade of leaves: D, MD and M thread.
Use for the medium shade of leaves: MD, ML and L thread.
Use for the lightest shade of leaves: ML, L and W thread.
It is so nice of you for stopping by, I love to hear from everyone of you, so please feel free to leave a comment.
If you have a question I will try and respond via e-mail. Please make sure your blogger profile is linked to your e-mail, otherwise I wont be able to e-mail you back.
If you need to reach me feel free to e-mail me at maartjequilt@gmail.com
Thanks so much for reading
Keep quilting!
Maartje Quilt
Amsterdam
Oh Maartje what a wonderful tutorial, thank you so much, it was so easy to follow and I enjoyed it so much as I have been visiting Japan for the last 50 years and have seen the gingko leaves in many different seasons, they are so beautiful to see on the trees in spring and on the ground in autumn. Cheers glenda Australia.
BeantwoordenVerwijderenGreat tutorial looks like a fun thing to try.
BeantwoordenVerwijderenBunny
You Gingko leaves are wonderful! Thanks for sharing this well thought out tutorial!
BeantwoordenVerwijderenBeautiful. I might have to try it after I practice enough to get a decent stitch
BeantwoordenVerwijderenZo mooi he, die gingko bladeren!
BeantwoordenVerwijderenYou make it look so easy. Thanks for the tutorial.
BeantwoordenVerwijderenBeautiful work and so gorgeous. Thanks for sharing Marie Stopping by from TTGF
BeantwoordenVerwijderenGreat tutorial! I love ginkgo leaves and have used them in several quilts.
BeantwoordenVerwijderenWhat a generous gift your tutorial is!! Thank you.....
BeantwoordenVerwijderenVery clear instructions. Nicely done and beautiful leaves,too.
BeantwoordenVerwijderenYour tutorial is fabulous. I can't wait to give it a try. Thank you for sharing.
BeantwoordenVerwijderenVery nice! Thanks for the tutorial. I have been practicing, so I will add this to my practice list.
BeantwoordenVerwijderenWonderful information! The leaves are beautiful.
BeantwoordenVerwijderenthis quilting is so beautiful! It's great to see the exact process of how you create them!
BeantwoordenVerwijderenThanks for sharing at Needle and Thread Thursday!
:) Kelly @ My Quilt Infatuation
Love the Ginko leaves, thanks for the tute!
BeantwoordenVerwijderenGreat tutorial, Maartje! Thanks so much for sharing! Whoop whoop!!
BeantwoordenVerwijderenThese leaves are very pretty. Thank you for sharing how they are made!
BeantwoordenVerwijderenNice! Thanks for sharing.
BeantwoordenVerwijderenthanks for sharing. I love ginko soooo much. I have one in my garden. I still tryed to sew a shape one year ago but it dosnt came out well. your is really great. now i can finaly do my ginko quilt that Waits for a long time.... claudia
BeantwoordenVerwijderenNice FMQ motif. Congratulations.
BeantwoordenVerwijderenHugs from Spain
I love doing gingko leaves Maartje, I love the shape and no matter what colour you do them in they always turn out well. I am doing a customer quilt now and trying something new with them...
BeantwoordenVerwijderen